 Hubble-like super wide field images of galaxies and nebulae are truly awe inspiring, and while it takes great skills to obtain such images and process them; many notable names in the field of
astrophotography employ gear that is not vastly different from yours or mine. I emphasize vastly because some do indeed have impressive equipment and dedicated observatories worth tens of the thousands of dollars. Nevertheless, many amateurs can obtain stellar wide-field images by combining smaller images into a single grand mosaic.
 |
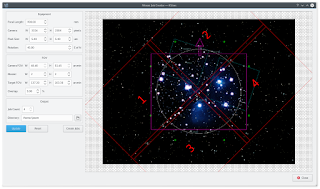
| M31 3x2 Mosaic in Ekos |
We are often limited by our camera+telescope Field of View (FOV). By increasing FOV by means of a focal reducer or a shorter tube, we gain a larger sky coverage at the expense of spatial resolution. At the same time, many attractive wide-field targets span multiple FOVs across the sky. Without any changes to your astrophotography gear, it is possible to create a super mosaic image stitched together from several smaller images. There are two major steps to accomplish a super mosaic image:
- Capture multiple images spanning the target with some overlap between images. The overlap is necessary to enable the processing software from aligning and joining the sub-images.
- Process the images and stitch them into a super mosaic image.
The 2nd step is handled by image processing applications such as PixInsight, among others, and will not be the topic of discussion here. The first step can be accomplished in Ekos Scheduler where it creates a mosaic suitable for your equipment and in accordance to the desired field of view. Not only Ekos creates the mosaic panels for your target, but it also constructs the corresponding observatory jobs required to capture all the images. This greatly facilitates the logistics of capturing many images with different filters and calibration frames across a wide area of the sky.
Before starting the Mosaic Job Creator in Ekos Scheduler, you need to select a target and a sequence file. The Sequence File contains all the information necessary to capture an image including exposure time, filters, temperature setting...etc. Start the Mosaic Job Creator by clicking on the icon next to the Find button in Ekos Module.
Next, enter the desired number of horizontal and vertical panels (e.g. 2x2, 3x3...etc) and then click Update. The target FOV shall be calculated given the number of panels and your camera's FOV and the mosaic overlap shall be displayed. By default, the percentage of the overlap among images is 5%, but you can change this value to your desired value. You can also move the complete mosaic structure around to fine tune the position of the mosaic panels. When satisfied, click Create Jobs and Ekos shall create an observation job and a corresponding customized sequence file for each panel. All the jobs shall be saved to an Ekos Scheduler List (.esl) file that you can load on any suitable observing night and it will pick off where you left. Before starting the Mosaic Job Creator, check that all the observation job conditions, constraints, and startup/shutdown procedures are as per your requirements since these settings shall be copied to all the jobs generated by the Mosaic tool.On first use, you need to enter your equipment settings including your telescope focal length in addition to camera's width, height, and pixel dimensions. Finally, you need to enter the rotation of the camera with respect to north, or the position angle. If you don't know this value, start Ekos and slew to to your desired target then use the Align module to solve the image and obtain the position angle.
With Ekos Scheduler, multi-night imaging is greatly facilitated and creating super mosaics has never been so easy. Get started with Ekos now and don't forget to post your results to INDI forums!
