Wednesday, December 23, 2015

Create Super Mosaic Images with Ekos

Hubble-like super wide field images of galaxies and nebulae are truly awe inspiring, and while it takes great skills to obtain such images and process them; many notable names in the field of
astrophotography employ gear that is not
 vastly different from yours or mine. I emphasize vastly because some do indeed have impressive equipment and dedicated observatories worth tens of the thousands of dollars. Nevertheless, many amateurs can obtain stellar wide-field images by combining smaller images into a single grand mosaic.
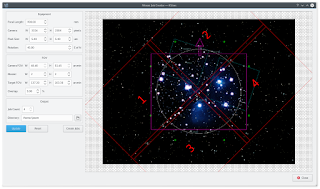
M31 3x2 Mosaic in Ekos
We are often limited by our camera+telescope Field of View (FOV). By increasing FOV by means of a focal reducer or a shorter tube, we gain a larger sky coverage at the expense of spatial resolution. At the same time, many attractive wide-field targets span multiple FOVs across the sky. Without any changes to your astrophotography gear, it is possible to create a super mosaic image stitched together from several smaller images. There are two major steps to accomplish a super mosaic image:
  1. Capture multiple images spanning the target with some overlap between images. The overlap is necessary to enable the processing software from aligning and joining the sub-images.
  2. Process the images and stitch them into a super mosaic image.
The 2nd step is handled by image processing applications such as PixInsight, among others, and will not be the topic of discussion here. The first step can be accomplished in Ekos Scheduler where it creates a mosaic suitable for your equipment and in accordance to the desired field of view. Not only Ekos creates the mosaic panels for your target, but it also constructs the corresponding observatory jobs required to capture all the images. This greatly facilitates the logistics of capturing many images with different filters and calibration frames across a wide area of the sky.
Before starting the Mosaic Job Creator in Ekos Scheduler, you need to select a target and a sequence file. The Sequence File contains all the information necessary to capture an image including exposure time, filters, temperature setting...etc. Start the Mosaic Job Creator by clicking on the icon next to the Find button in Ekos Module.

Next, enter the desired number of horizontal and vertical panels (e.g. 2x2, 3x3...etc) and then click
 Update. The target FOV shall be calculated given the number of panels and your camera's FOV and the mosaic overlap shall be displayed. By default, the percentage of the overlap among images is 5%, but you can change this value to your desired value. You can also move the complete mosaic structure around to fine tune the position of the mosaic panels. When satisfied, click Create Jobs and Ekos shall create an observation job and a corresponding customized sequence file for each panel. All the jobs shall be saved to an Ekos Scheduler List (.esl) file that you can load on any suitable observing night and it will pick off where you left. Before starting the Mosaic Job Creator, check that all the observation job conditions, constraints, and startup/shutdown procedures are as per your requirements since these settings shall be copied to all the jobs generated by the Mosaic tool.On first use, you need to enter your equipment settings including your telescope focal length in addition to camera's width, height, and pixel dimensions. Finally, you need to enter the rotation of the camera with respect to north, or the position angle. If you don't know this value, start Ekos and slew to to your desired target then use the Align module to solve the image and obtain the position angle.
With Ekos Scheduler, multi-night imaging is greatly facilitated and creating super mosaics has never been so easy. Get started with Ekos now and don't forget to post your results to INDI forums!

Tuesday, October 6, 2015

Direct FITS overlay on the sky map

In upcoming KStars 2.4.0, due to be released in KDE Application 15.12, astrophotographers will enjoy a new feature that would help them further in framing and visualizing their images: Direct FITS overlay!

Before you use Ekos Align module, make sure to enable both World-Coordinate-System (WCS) and Overlay checkboxes. WCS appends parameters to the captured FITS image to include information on the celestial coordinates, rotation, and scale..etc. Once you perform your first successful alignment, and subsequent images will be scaled and drawn directly on the sky map.


Sunday, September 20, 2015

FITSViewer Histogram gets a face lift

The FITS histogram tool is one of the few tools in KStars that did not receive any significant updates for more than 10+ years. I first wrote it back in 2004 and used a custom painting widget to show the overall shape of the histogram. But with KStars gaining color FITS support a while back, it was necessary to support multi-channel histogram within the viewer.

While the FITSViewer tool, as the name suggests, is not designed for processing of astrophotography images; features such as the histogram and statistics tools are often important for decision-making during the capture process and for quickly inspecting images, and hence they were made available to the end user. The histogram implementation was also quite buggy as it was designed for 8-bit FITS, but now KStars support 8, 16, 32-bit signed integer, 32-bit IEEE floating point, and 64-bit IEEE double precision floating point. The updated implementation now caters to all data types and is smarter about selection of bin widths for each image.

In addition to supporting multi-channel histograms, the GUI was revamped and is now utilizing the amazing QCustomPlot library. At first, I wanted to utilize the KPlotting KDE library, which was authored by our very own Jason Harris, KStars founder back in 2001! But QCustomPlot offers several advantages over KPlotting including user interaction capabilities such as zoom and drag in addition to a host of other features. Furthermore, QCustomPlot is being actively developed while KPlotting hasn't received any noticeable updates in a very long time.

The following is a screenshot of the older histogram implementation:


And this the updated implementation, to be available for KDE Applications 15.12:


Tuesday, June 30, 2015

KStars GSoC 2015 Project


This year marks my first year as a Google Summer of Code (GSoC) mentor, and it has been an exciting experience thus far. I have been a KStars developer for the last 12 years and it is amazing what KStars has accomplished in all those years.

Since KStars caters to both casual and experienced astronomy enthusiasts, the KStars's 2015 GSoC projects reflects this direction. For the casual educational fun side, I proposed the inclusion of constellation art work to be superimposed on the sky map. KStars currently draws constellation lines, names, and boundaries, but constellation art is missing. We required that the data structure must support multiple sky cultures (e.g. western, Chinese..etc) and the artwork itself must be available under a permissible license. New constellation artwork should be available for download using the KNewStuff framework. 

Here is a very early look at the constellation art in KStars. The student still needs to work on scaling, rotation, among other things, but it looks promising! But the end of the project, all 88 western constellations can be viewed within KStars in addition to another cultural group.


For the more advanced users who utilize KStars to perform astrophotography, I proposed a simple Ekos Scheduler tool.

Ekos is an advanced astrophotography tool for Linux. It utilizes INDI for device control. With Ekos, the user can use the telescope, CCD, and other equipment to perform Astrophotography tasks. However, the user has to be present to configure the options and to command the actions to perform all the astrophotography related tasks, and hence a scheduler is required to automate observations to be constrained within certain limitations such as required minimum angular separation from the moon, whether conditions...etc. Furthermore, the observations should be triggered when certain conditions are met such as observation time, object's altitude...etc.

The Ekos scheduler is still at very early stages but the workhorse algorithm responsible for dispatching observations jobs is in the works and should be completed soon. Even though the scheduler is currently an Ekos module, it operates by utilizing Ekos DBus interface completely. 


Fortunately for KStars, both projects were accepted in GSoC 2015 and I am glad to be working with two very talented and highly motivated students:
The students have made good progress on the objectives of the project and been great when it comes to communications. Being introduced to a new framework and a new paradigm of thinking is a shock to new comers who need time to adjust and get the wheel rolling.

I certainly hope the projects stay on track and get completed on time!

Wednesday, February 18, 2015

Automatic Meridian Flip in Ekos

Over the past couple of weeks, I worked on a new feature in Ekos: Automatic Meridian Flip.

Equatorial mounts flip after crossing the meridian in order to prevent the imaging equipment train from hitting the tripod. With Ekos, you can set an hour angle limit which if exceeded, the mount will be commnded to flip. The mount must begin tracking east of the meridian in order to the meridian flip to be commanded in Ekos.

When commanding a meridian flip, Ekos will suspend the autoguiding process and waits until the mount completes the flip. Once the mount begins tracking again post meridian flip, Ekos will plate-solve and make any necessary slew commands to bring the mount to the exact location it was tracking prior to the flip.

Next, it will automatically capture a frame and select a suitable guide star, performs calibration, and resumes autoguiding. If In-Sequence focuing is enabled, it will also capture and focus a suitable star. It then resumes the capture process form where it left.

All these steps are completely automated and require no user intervention! Watch the video below for a live demo of this feature!


Tuesday, February 3, 2015

3D Cube FITS & Debayer support in KStars

Recently I was finally able to close BUG#305960 where a user requested support for 3D Cube FITS support in KStars. The FITSViewer tool always supported monochrome images since its inception, as this is what most CCD cameras in astronomy use. But single-shot color CCDs and DSLRs' utilization within the astrophotography world kept growing over the last few years.

Now the FITSViewer tool can display any 2D (monochrome) & 3D (color) cube FITS, and while most of the operations in KStars are geared toward single-channel images, the migration to 3 channel support was relatively smooth.


In addition to the 3D cube support, the FITSViewer tool can debayer images captured from color cameras and stored in RAW format with a specific color filter array (CFA).

DSLR users will gladly welcome this feature as they can inspect their color RAW images in color and may adjust the debayer parameters to produce a clear image of their target. Internally, KStars converts the debayerd image to a 3D Cube FITS without changing the RAW data at all. While the user may save the file as a 3D Cube FITS, it is not recommend. In fact, the debayer functionality should only be used to inspect the image, and the RAW image should always be processed under a dedicated astrophtography tool like PixInsight in order to carry out proper calibration procedure before any integration and registration processes.


In addition to DSLRs, the SBIG CCD INDI driver now also supports color CCDs. More INDI CCD drivers will have color support soon.